Put Your Home Karaoke System Together
You may organize your system components into an entertainment center or simply set up on a sturdy table. Make sure that all your components are plugged into a good
surge protector as they are very susceptible to damage from power surges.
Connecting Audio to a Mixer
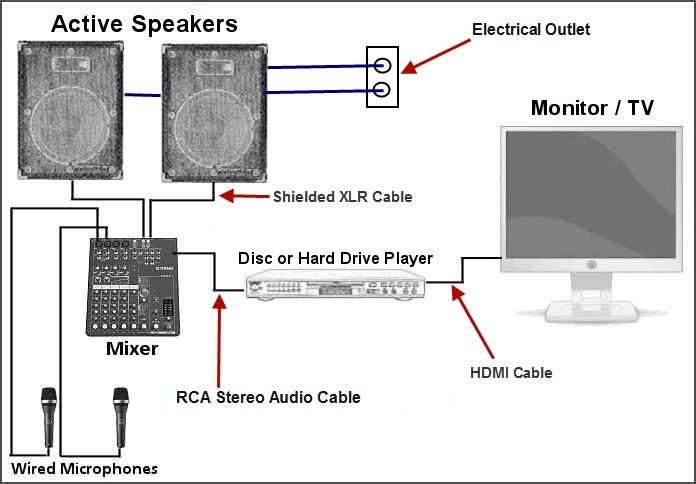
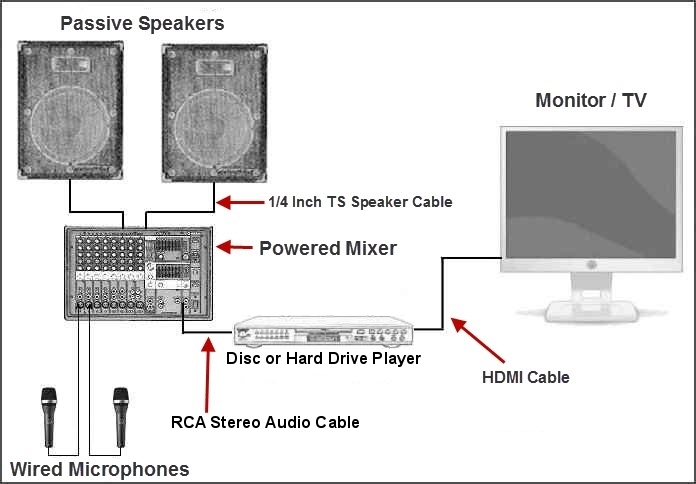
The "audio in" connections of a mixer are going to be two (left and right) RCA receptacles, or two (left and right) 1/4" TS receptacles, or a USB receptacle if the mixer is so equipped. The audio out connections of a karaoke disc or hard drive player are typically going to be two (left and right) RCA receptacles. The cable to use here is either the basic
Dual RCA Cable or a
Dual RCA to Dual 1/4" TS Adapter Cable.
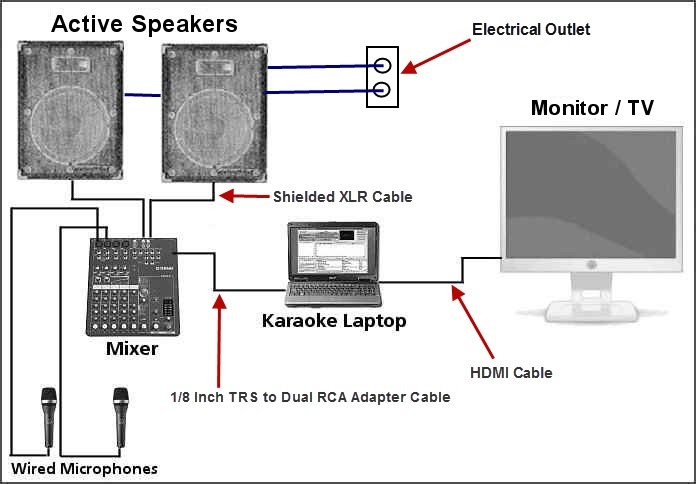
If you are using a computer as the player it is highly recommended that you opt for a
USB capable mixer. A bi-directional digital USB connection is superior to an analog connection and also allows you to easily send the main mix back to the computer for recording. A single USB cable is required.
To connect to a mixer without USB capability the audio from a computer will be coming from the 1/8" TRS earphone jack. To connect to the two RCA receptacles on the mixer you will need a
Dual RCA to Dual 1/4" TS Adapter Cable. If the mixer has only 1/4" TS inputs you will use a
1/8" TRS to Dual 1/4" TS Adapter Cable.
Connecting Passive Speakers to an Amplifier
Virtually all amplifiers (including powered mixers) will have 1/4" TS output connections. Virtually all passive PA speakers will have 1/4" TS input connections. Heavy gauge
1/4" TS speaker cables are typically used. These come in various lengths and gauges. Your home system is not likely to require over 30 foot long cables.
Connecting Powered Speakers to a Mixer
Active speakers require light gauge shielded cables. Basically, these are standard microphone cables. Virtually all modern active speakers have XLR inputs. Most of the audio mixers that you might use for a home karaoke system will have 1/4" TS and/or XLR outputs. Best case scenario would be to use
shielded XLR cables.
It's a good idea to put your full range speakers on
stands. Optimally, the top of the speakers should be at least 6 feet off the floor.
Connecting microphones to a Mixer
Most of the better wired microphones come with XLR cables. Virtually all modern mixers will have 1/4" TS and XLR channel inputs. The 1/4" TS microphone cables are fine to use, if necessary, unless the cables are over 25 feet long at which point
XLR cables should be used.
Wireless microphone receivers often have both 1/4" and XLR outputs. The microphone receiver generally sits very close to the mixer and short cables should be used. XLR and 1/4" TS cables work equally well.
Each microphone will be plugged into a separate channel of the mixer. You will be able to control the volume, tone, and effects, of each mic individually.
Connecting Video Output to a TV
You are only concerned with connecting video to a TV as the TV's speakers and audio system will not be used. Best case scenario is that a video output connection from the player will match up with a video input source of the TV and allow them to be connected with a simple cable.
Virtually all modern karaoke players, laptop computers, and TVs have HDMI connections. Naturally a single
HDMI cable is all you will need. HDMI also provides audio so you will want to mute the sound on the TV while performing karaoke.
If you are working with older electronics you may need to use a
composite video cable. Some older karaoke machines and TVs have S-Video connections. Older laptops may offer only VGA and S-Video outputs. You may need to get creative but there will be some way to connect the video.
Adjusting the Sound
The first time you fire up your system you will want to make some initial sound adjustments. Play a song that you are very familiar with at a reasonably loud volume level. You want to be able to hear the full range of sound. The EQ sliders of the mixer should all be set to neutral (center) or knobs at top center for mixers without EQ sliders. This means you are playing the music exactly how the producer wanted you to hear it and it probably sounds pretty good. Adjustments are made to compensate for the acoustic qualities of the room.
Make subtle adjustments to the lows and highs until you feel you have achieved the best sound. You may want to ask others for their opinion. This is a trial and error type of thing and you will eventually find just the perfect settings.
It is very difficult to adjust the microphones while you are singing. Have someone else sing a karaoke song while you make adjustments. As with the music, start off with all the levels at neutral. The only effect you should always use with the mikes is reverb. The trick is to add just enough to make the singer sound good, without it being obvious that reverb is being used. Too much reverb will cause the "singing in a barrel" effect. The right amount of reverb may be easy to hear when talking over the mike, but not noticeable when singing while the music is playing.
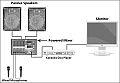
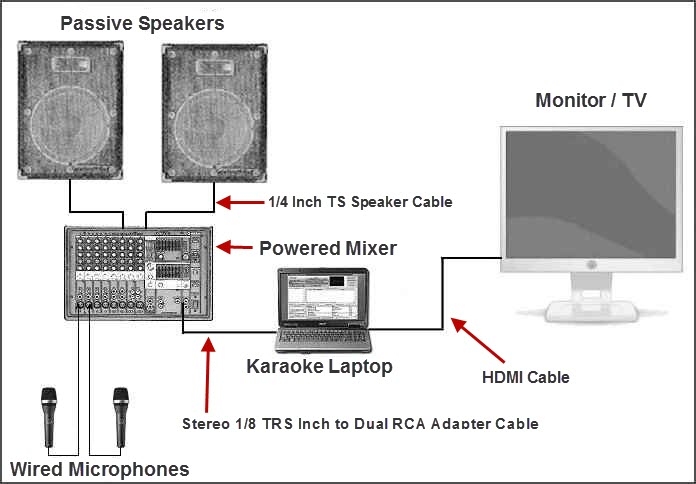
Diagrams of Common Karaoke System Configurations
Below you will find diagrams of several typical component configurations. Click the link to display the image.
- Audio mixer, active speakers, disc player, and wired microphones.
- Audio mixer, active speakers, karaoke laptop, and wired microphones.
- Powered mixer, passive speakers, disc player, and wired microphones.
- Powered mixer, passive speakers, karaoke laptop, and wired microphones.
No wireless microphone were included in any of the diagrams but the wireless receiver would connect to the system the same as the wired mics.
To Conclude
The information I've given you should help you build a good sounding karaoke system for your home. I realize that I have probably left some questions about your home karaoke system unanswered. I purposely try to keep information to a minimum to avoid making you do a lot of reading while still coming to the same ultimate conclusion. Please feel free to
contact me with any karaoke related questions you may have.
With your home karaoke system you can be the person people talk about when they rave about a great party they went to. Your child or teen could be the envy of his or her friends when you throw them a karaoke birthday or other party. I can assure you that kids absolutely love karaoke.
Article by Richard Wise.