Setting Up Your Karaoke Component System
Location
Most bars and clubs have a predefined location for setting up your system. This can sometimes be negotiated and sometimes not. You will need at least a six foot table to set up on. Most places have extra tables that you can use even if you have to slide several small tables together. I have an 8 foot, heavy duty, plastic folding table that I can take with me if needed. Unlike a DJ, you will not be sitting all night, hidden behind your system, spinning CDs. You will be standing most of the time interacting with your crowd. You should set up your system against a wall facing the room. This will also hide your wiring from view.Rack and Components
The basic layout is to place your component rack to the extreme left end of your set up table. This leaves the rest of the table for your music and working with request forms. Slide your mixer/amp and player into place and set your TV (or monitor) on top of the rack. Place your wireless mic receiver(s) on top of the TV.Cable Hook-Ups
Although different makes and models of components are configured differently they all hook up basically the same way.Player & RF Converter
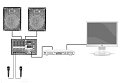
You will use a double RCA cable to connect the audio outputs on the back of the player to the RCA audio inputs on the front of the mixer/amp. Feed the cable through the space between the rack and the mixer/amp. Connect a single RCA cable from the Video Out on the back of the player to the Video In on the RF Converter. Connect a short, standard TV cable from the TV Out of the RF Converter to the cable connection on the back of the TV. Note that the RF Converter may have a channel selection switch usually for channels 3 or 4. Be sure to set it and the TV to the same channel.Microphone Receivers
Two, 6 foot, light duty speaker cables are used to connect the microphone receivers to 2 separate channels on the front of the mixer/amp. Some receivers are adapted to use the balanced XLR cables. Which ones are better is debatable. Feed the cables between the rack and the mixer/amp.Speaker Placement
I most cases you will want to place the speakers as far apart from each other as possible. You should also keep the speakers as far away as you can from your TV or monitor to help eliminate feedback as this is where most people will be standing with a microphone in their hand. If at all possible, keep the speakers even with or behind your setup table. It is very difficult to adjust the sound from behind the speakers. Run your speaker cables along the wall or string them from the ceiling if you can. Otherwise you will need to duct tape them to the floor to prevent someone from tripping over them.Connecting Power Sources
It's best to have all your system cables connected properly before you connect the power supply. Plug your microphone receiver transformer(s) into the surge protector power strip and connect them to the power input of the receiver(s). Plug in the amp, player, RF converter, and TV plugs into the power strip. Make sure that the switch on the power strip is set to the off position and plug it into a wall outlet or use an extension cord if necessary. If you're wondering about the power consumption of your karaoke system consider this. A typical hair blow dryer consumes more power that your entire system.Power Up The System
Make sure that all of the volume controls on the amp are turned all the way down. Turn the switch on the power strip to the on position. Turn on the microphone receiver(s), player, amp, and TV. Most RF converters do not have a power switch. The first thing to do is to make sure the video setup is working. At this point the TV should have a solid blue screen. Place a CDG disc into the player and play one of the tracks. If the lead in graphics and lyrics display correctly then your good to go. If not, you will need to retrace the player - RF converter - TV cable configuration and channel settings. The amp should have a master volume control. Turn this up to about half the maximum. Now slowly turn up the volume control on the amp that controls the player to an acceptable volume. Don't worry about any equalizer settings at this point. Now turn on the switch or switches on one of the hand held mics. Slowly turn up the volume control on the amp that controls the mic. If you start to receive feedback then back off the volume a little. You're now ready to sing a song a fully check out the system.Fine Tuning
So what's the best equalizer setting for karaoke? In short, there is no best setting for every situation. With the equalizer set flat (all sliders in the center position) the sound is played just as it was recorded on the disc. Under ideal conditions this would be fine. However, there are very rarely ideal conditions. Room size, acoustics, and even the number of people in the room determine if you need to boost the bass, highs, or both frequencies. You have to rely on your ear for good sound. Don't hesitate to take advice from people in the crowd at your shows, especially the good singers. People who can sing well normally have a good ear for music. You can use the separate channel controls to tweak the sound of your mics.Article by Richard Wise.